T-shirt sizing for VMs
4 minute read
Use preconfigurations to bundle a group of options into a single choice on the order form. This lets you offer a friendly, technology-agnostic set of sizes (such as small, medium, and large) that align with your corporate standards for server ordering.
Different resource handlers use different size parameter names: AWS uses instance_type, Azure uses node_size, GCP uses gcp_node_size, and vCenter uses cpu_cnt, mem_size, and disk_size. The vCenter parameters are built in. The AWS, Azure, and GCP parameters are created when the matching resource handler is configured, so they appear in a preconfiguration’s Custom fields list only after that handler exists.
AWS instance types
Suppose you want to offer Small, Medium, and Large sizes across all environments, but AWS exposes dozens of instance types. The goal is consistent naming sizes across AWS, vCenter, and other clouds, so that a “small” in vCenter is as close as possible to a “small” in AWS. For example, your standards might map to AWS instance types as follows:
| Option | AWS instance type |
|---|---|
| Small (2 CPU, 4 GB) | t3.medium |
| Medium (2 CPU, 8 GB) | t3.large |
| Large (4 CPU, 16 GB) | t3.xlarge |
Create the preconfiguration
- Go to Admin > Preconfigurations and select New preconfiguration.
- In the dialog, enter the label Server Size and the name
aws_server_size. - Use the Custom fields field to select the Instance type (
instance_type) parameter, then select Create. - Select the Edit icon in the Options column for your new preconfiguration, and add options for Small, Medium, and Large.
- For each option, enter the corresponding instance type and an Order value that increases with size (for example, 1, 2, 3), then Save.
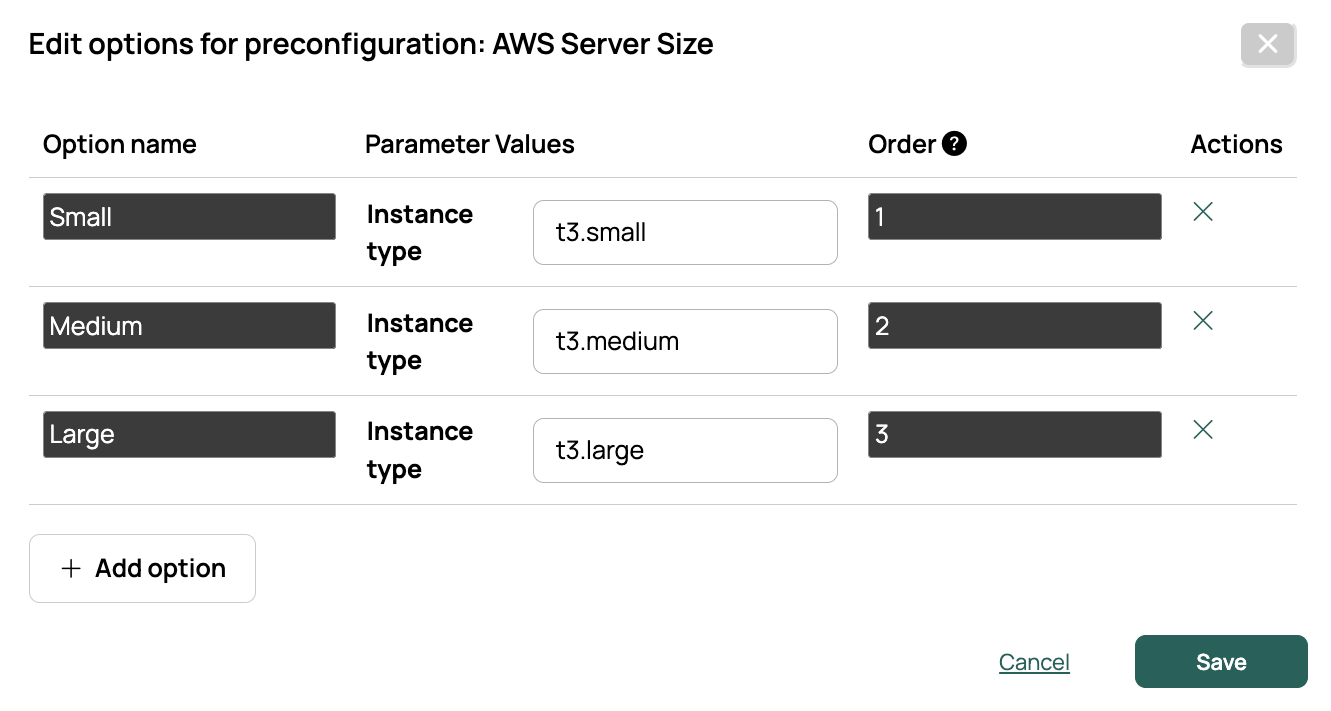 (opens full-size image in a new tab)
Configure the environment
- In the AWS environment, open the Parameters tab and select Add.
- Find the parameter labeled Server Size (name
aws_server_size) and add it to the environment. - Order an ad hoc server to test. You should see a Server Size field with Small, Medium, and Large options.
VMware vCenter
For vCenter, you might standardize on the following t-shirt sizes:
| Small | Medium | Large |
|---|---|---|
| 2 CPUs 4 GB RAM 25 GB disk |
2 CPUs 8 GB RAM 50 GB disk |
4 CPUs 16 GB RAM 100 GB disk |
Create the preconfiguration
- Go to Admin > Preconfigurations and select New preconfiguration.
- In the dialog, enter the label Server Size and the name
vcenter_server_size. - Use the Custom fields field to select the CPUs (
cpu_cnt), Mem Size (mem_size), and Disk Size (disk_size) parameters, then select Create. - Select the Edit icon in the Options column for your new preconfiguration, and add options for Small, Medium, and Large.
- For each option, enter the corresponding CPU count, memory (GiB), and disk (GiB), and an Order value that increases with size (for example, 1, 2, 3), then Save.
Configure the environment
- In the vCenter environment, open the Parameters tab and select Add.
- Find the parameter labeled Server Size (name
vcenter_server_size) and add it to the environment. - Order an ad hoc server to test. You should see a Server Size field with Small, Medium, and Large options.
Azure node sizes
Azure is similar to the AWS example, with one difference: on the standard order form, Azure node sizes are generated parameters determined by the selected storage type. Determine your standard sizes, verify the storage type required for each node size, then create the preconfiguration.
Disable the generated parameter options
- Go to Admin > Orchestration Actions and find the Generated Parameter Options hook point under the Parameters category.
- Disable the two actions that regenerate these parameters:
- List available azure node sizes based on storage type (controls Node Size,
node_size) - List Azure Storage Type options (controls Storage type,
storage_account_type_arm)
- List available azure node sizes based on storage type (controls Node Size,
Create the preconfiguration
- Go to Admin > Preconfigurations and select New preconfiguration.
- In the dialog, enter the label Server Size and the name
azure_server_size. - Use the Custom fields field to select the Node Size (
node_size) and Storage type (storage_account_type_arm) parameters, then select Create. - Select the Edit icon in the Options column for your new preconfiguration, and add options for Small, Medium, and Large.
- For each option, enter the corresponding node size and storage type, and an Order value that increases with size (for example, 1, 2, 3), then Save.
Configure the environment
- In the Azure environment, open the Parameters tab and select Add.
- Find the parameter labeled Server Size (name
azure_server_size) and add it to the environment. - Order an ad hoc server to test. You should see a Server Size field with Small, Medium, and Large options.
Re-enable the generated parameter options
- Go to Admin > Orchestration Actions and find the Generated Parameter Options hook point under the Parameters category.
- Enable both actions again: List available azure node sizes based on storage type and List Azure Storage Type options.
Related
- Preconfigurations: Define the sizes users choose from.