Hyper-V
10 minute read
CMP discovers the virtual machines already on the instance, provisions new ones, customizes Windows and Linux guests, manages their disks and networks, and runs scripts against them.
Supported versions
- Windows Server 2025
- Windows Server 2022
- Windows Server 2019
- Windows Server 2016
Before you begin
What CMP connects to depends on whether the instance is standalone or clustered.
Standalone instances
- Use an IP address or DNS name that the CMP appliance can resolve.
- Firewall rules must allow WinRM, typically on port 5985 or 5986.
Clustered instances
- Use the cluster’s IP address or hostname, not that of an individual node.
- If you use a hostname or an alias, configure DNS or hostname resolution on the CMP appliance.
- The WinRM protocol and transport you choose must be enabled on every cluster node.
Certificates for SSL Verification
SSL Verification works only when each cluster node has a valid certificate. Run winrm get winrm/config/Service on a node: the CertificateThumbprint property shows whether a certificate is configured.
Add a Hyper-V resource handler
-
Go to Admin > Resource Handlers.
-
Select Add, then select Hyper-V.
-
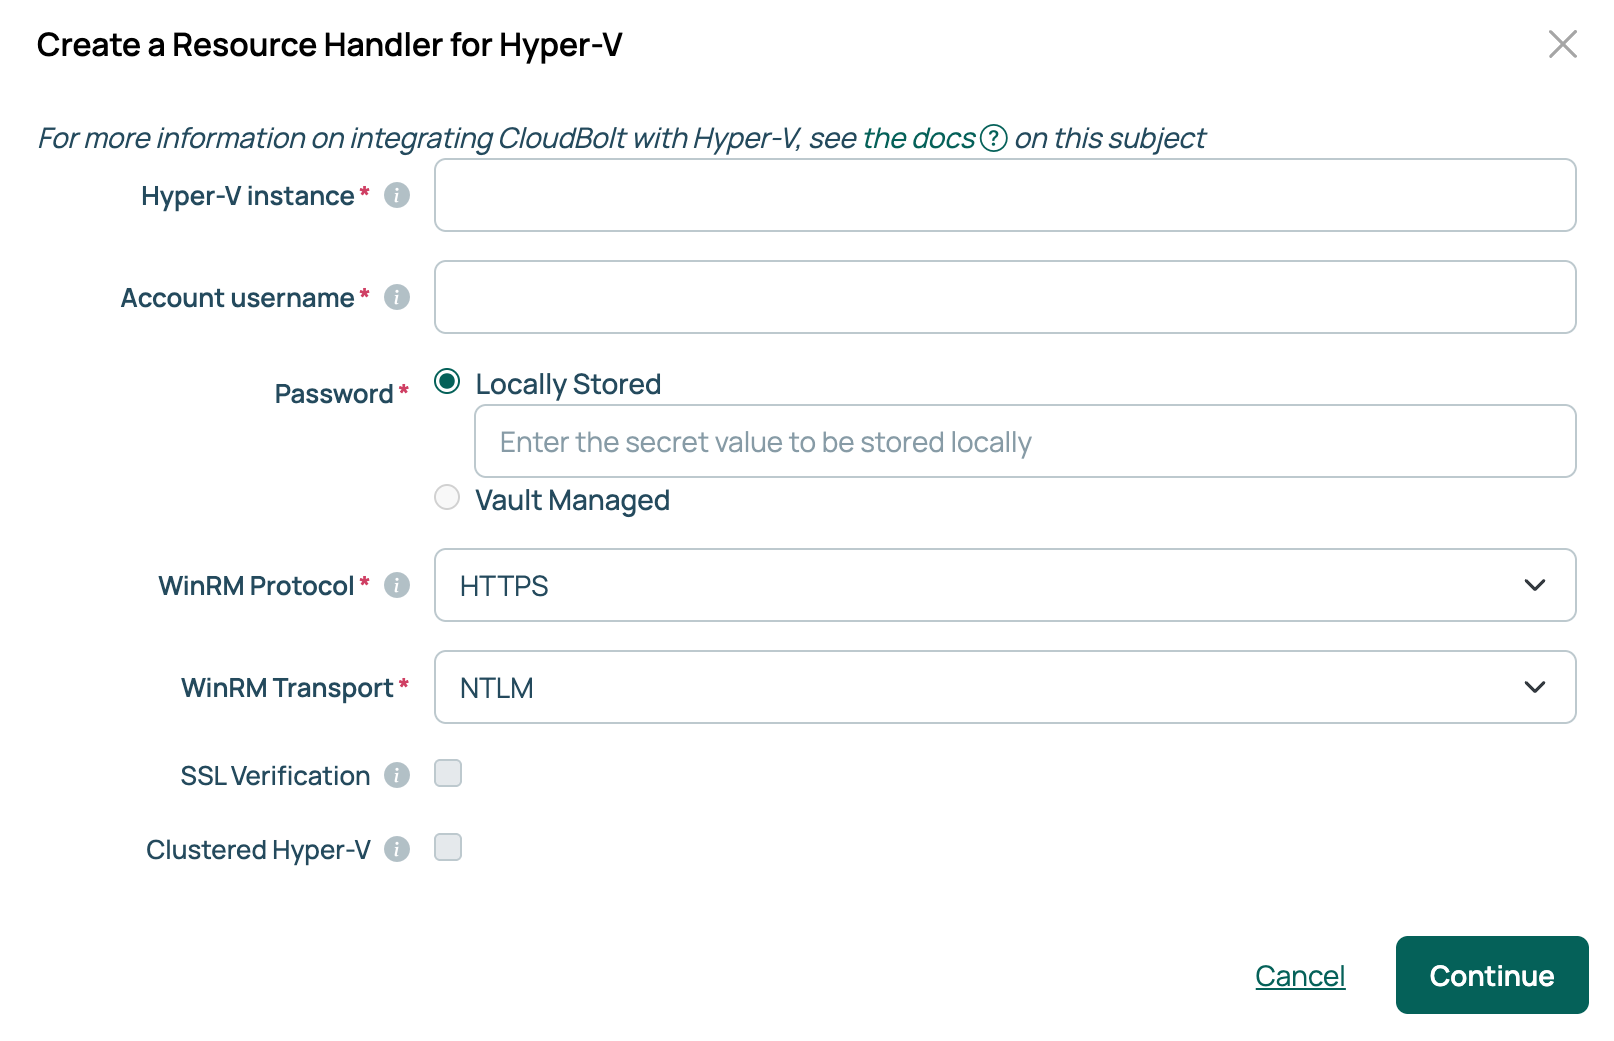
In Hyper-V instance, enter the IP address or hostname of the instance, or of the cluster if it is clustered.
-
Enter an Account username.
-
Enter the Password.
-
Choose the WinRM Protocol, HTTPS or HTTP, and the WinRM Transport: NTLM, CredSSP, Kerberos, or Plain Text.
-
Select SSL Verification to verify the instance’s certificate, or clear it to skip verification.
-
Select Clustered Hyper-V to connect to a cluster, or leave it clear to connect to a standalone instance.
-
Select Continue.
-
Enter a Name and, optionally, a Description.
-
Optionally enter a comma-separated list under VM Names to Ignore, then enter the path to an Images Directory where Hyper-V images are stored.
-
Select Done.
Credentials
The handler accepts Windows Active Directory domain credentials and local credentials, in any of these username formats:
- NetBIOS, such as
DOMAIN\usernameorCOMPUTERNAME\username - User principal name, such as
username@domainname.com - A local username with no prefix, such as
username
If the password vault feature is enabled, Password offers Locally Stored or Vault Managed. Select Vault Managed to read the secret from a configured vault provider. See Use password vaults.
WinRM configuration
- The protocol and transport you choose must be enabled on every target Hyper-V system.
- Plain Text is not recommended. It passes credentials in clear text and relies on the protocol for encryption.
- Plain Text does not work with Active Directory domain credentials. Windows requires encrypted authentication, so use NTLM or stronger.
Kerberos requirements
Configure the Kerberos client configuration file, krb5.conf, on the CMP appliance, then test it:
kinit username@DOMAIN.COM
klist
kdestroy
If kinit fails, the configuration is incorrect.
Images Directory
- Every exported Hyper-V image has to sit in this directory. CMP cannot discover images stored anywhere else.
- The default is
C:\Hyper-V\exports. - VM Names to Ignore accepts regular expressions. For example,
DEV.*,PRODAPP123excludes VMs whose names begin with DEV, and the VM named PRODAPP123.
Environment mapping
A Hyper-V resource handler maps to exactly one environment, so each standalone instance and each cluster needs its own handler and its own environment.
Cluster communication
Depending on the operation, CMP communicates with either the cluster or one of its nodes. It records each node against the environment when the handler is created, and a clustered handler’s environment gains a Cluster Nodes tab listing them.
Limitation
CMP does not detect a cluster node added after the resource handler was created. Contact CloudBolt Support if you need help with this.
Environment parameters
The Hyper-V resource handler adds the following parameters:
| Name | Details |
|---|---|
Hyper-V Cluster Host (hyperv_cluster_host) |
The cluster node a VM is attached to. Available on clustered handlers only. |
Hyper-V Storage Path (hyperv_storage_path) |
Storage location where VMs are created. A clustered instance must use shared storage reachable from every node. |
Hyper-V Integration Services (hyperv_integration_services) |
Integration services to enable on the VM at provision time. Selecting Guest Service Interface lets commands run from the host to the guest without WinRM enabled on the guest, and requires VM credentials. |
Hyper-V Nested Virtualization Support (nested_virtualization_support) |
Enables nested virtualization, so the VM can run Hyper-V or another hypervisor inside the guest. |
Hyper-V Enable Secure Boot (hyperv_enable_secure_boot) |
Enables Secure Boot in the VM’s BIOS settings. Only Generation 2 VMs support Secure Boot. |
Hyper-V Secure Boot Template (hyperv_secure_boot_template) |
The Secure Boot template applied when Secure Boot is enabled on a Generation 2 VM: MicrosoftWindows, MicrosoftUefiCertificateAuthority, or OpenSourceShieldedVM. MicrosoftWindows is the Hyper-V default. |
Hyper-V images
Hyper-V images are VMs exported from the Hyper-V GUI and stored in the folder you specify during export.
- If you export the image with the same unique identifier as the VM, delete the VM. Otherwise, CMP cannot run the validations it needs to import the image.
- Export to the same folder as the Images Directory set in the resource handler, or the handler will not find the exported images.
For Linux images, complete the extra steps in Prepare a Linux image before you export.
Virtual machines
Creation
CMP creates a VM’s disk and machine files in a subfolder of the requested path, named after the VM, such as C:\ClusterStorage\VMs\%VMNAME%. A standalone VM can be stored on any existing path; a clustered VM must be stored on a path shared between all nodes.
Customization
CMP customizes Windows guests with Sysprep and Linux guests with cloud-init. To control how long it waits for a server to report ready, see Waiting for a server to be ready.
Windows
Answer file
CMP runs Sysprep during provisioning to customize the installation. Use the hyperv_sysprep_file parameter to customize the answer file.
You can also override the default answer file by placing your own at /var/opt/cloudbolt/proserv/windows_unattend.xml. When that file exists, it overrides the default template shipped in the Hyper-V handler’s directory under the CMP installation.
Do not modify the default answer file. It is overwritten during upgrades.
See using Windows Sysprep with resource handlers.
Networking
If no DHCP server exists and IPAM or resource pools are defined, the answer file includes the details of every required network interface card. When several NICs are defined and only some have IPAM or a resource pool configured, only those needing a static address or DNS information are added to the answer file.
Do not use a DHCP addressing scheme with IPAM or resource pools.
When you configure IPAM or a resource pool for a network, set the network’s Addressing Scheme to Static only or User defined.
Limitation
Internal and Private network types are not cluster-aware. Migrating clustered Hyper-V instances that use them fails.
Linux
CMP customizes Linux VMs with cloud-init. It delivers the configuration on a seed ISO, attaches a DVD drive to the VM, mounts the ISO, and removes it once customization is complete.
Change in behavior
CMP no longer sets the Linux hostname by editing the hostname file. cloud-init handles the hostname and network configuration with native Linux tools across a wider range of distributions. Existing Linux images need cloud-init installed and have to be prepared again, as described in Prepare a Linux image.
Image requirements
- SSH access to the guest must be available. CMP verifies the hostname and readiness over SSH during provisioning.
- cloud-init must be installed and enabled in the source image. Customization fails on an image without it.
- The
hyperv-daemonspackage must be installed, with the KVP daemon servicehypervkvpdrunning. - The Hyper-V Key-Value Pair Exchange integration service, also known as Data Exchange, must be enabled.
Prepare a Linux image
-
On the source VM, reset the cloud-init state:
cloud-init clean --logs --seed --machine-id # Older versions of cloud-init do not support --machine-id. # If yours does not, also run: truncate -s 0 /etc/machine-id -
Verify the hostname matches the image template name, and change it if it does not.
-
Shut down the VM.
-
From Hyper-V Manager, export the VM to the Images Directory configured on the resource handler.
-
Remove the exported VM from your Hyper-V inventory.
-
In CMP, open the resource handler, select the Images tab, select Import Images, then set the image credentials and the available environment.
Networking
cloud-init supports network changes for non-DHCP networks, where addresses are assigned by IPAM or a resource pool. The DHCP addressing scheme restriction described for Windows applies to Linux guests too.
Custom user data
Use the hyperv_user_data parameter to supply your own cloud-init user data. It extends the default customization: CMP merges it into the seed alongside the hostname and network configuration.
The value is rendered through the Django template engine, so you can reference fields such as {{ server.hostname }}. Wrap literal Django syntax in {% verbatim %} tags to stop it being rendered.
Limitation
Generation 1 images with several disks on IDE controllers cannot be customized. An IDE controller supports only two devices, leaving no room for the DVD drive that CMP attaches to deliver the cloud-init seed.
Use Generation 2 images where you can. They support 50 or more devices per controller and boot using UEFI.
Network names
When CMP adds a network to a Hyper-V resource handler, it names the network after the Hyper-V switch with the handler’s name in parentheses, such as External (HV-Host2). This keeps switches with the same name on different handlers separate. If the name is already taken, CMP adds a number, such as External (HV-Host2) (2). Rename a network if you want a friendlier name.
This naming applies from CMP version 2026.3.97. Networks added before then keep their names.
VLAN-enabled networks
CMP can assign VMs to a specific VLAN on a Hyper-V network through VLAN-aware network entries you create on the resource handler. A VLAN-aware network can then be selected at order time or applied to an existing VM.
This feature requires CMP version 2026.2.72 or later.
Add a VLAN-aware network
- Open the resource handler and select the Networks tab.
- Select Add Network with VLAN.
- Select the Hyper-V Network Switch to create a VLAN variant of.
- Enter the VLAN ID, between 1 and 4094.
- Select Add Network with VLAN. The new network appears in the list.
- Rename the network if you want something friendlier. The name is what users see when they provision a VM or change its network.
Assign a VLAN-aware network to a VM
- At order time: select the VLAN-aware network from the network list when you provision the VM.
- After provisioning: open the server’s Network tab, select the pencil icon on the NIC, and select the VLAN-aware network.
You can switch between networks in either direction, including between VLAN-aware and non-VLAN-aware networks.
Verify VLAN assignment in Hyper-V
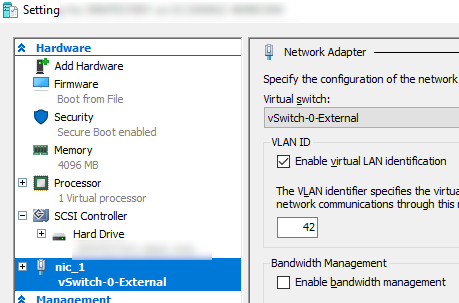
Open the VM settings in Hyper-V, select the NIC, and check that Enable virtual LAN identification is selected and the VLAN ID matches.
 (opens full-size image in a new tab)
Disks
Add blank disks during provisioning with the disk_#_size parameters. Hyper-V disks are dynamic, and CMP adds them to the VM’s existing controller, which supports more than 50 disks.
Limitations
- Fixed and differencing disk types are not supported.
- Multiple controllers are not supported.
WinRM parameters
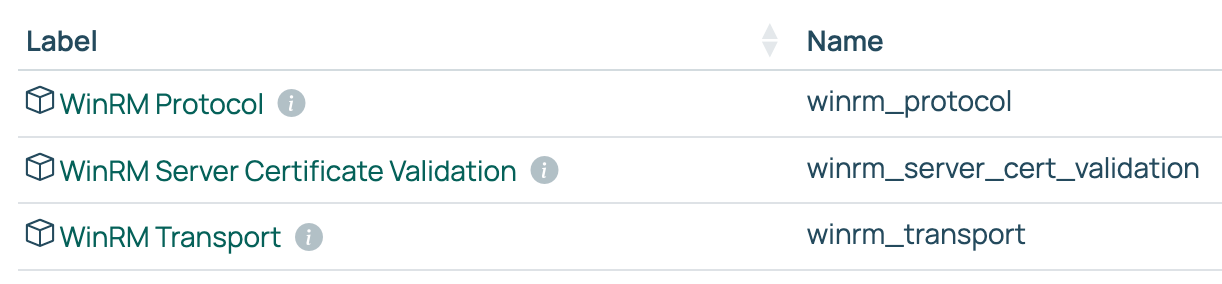
CMP supports per-server WinRM configuration through parameters, used when the Remote Script with WinRM action runs a script.
 (opens full-size image in a new tab)
| Name | Values | Details |
|---|---|---|
WinRM Protocol (winrm_protocol) |
http, https |
The connection protocol. |
WinRM Server Certificate Validation (winrm_server_cert_validation) |
validate, ignore |
Whether the server’s certificate is verified. |
WinRM Transport (winrm_transport) |
ntlm, kerberos, credssp, plaintext |
The authentication transport. |
- These parameters override
ENCRYPT_WINRMincustomer_settings.pywhen you useserver.execute_script. common.methods.run_script_on_targetignoresENCRYPT_WINRMand uses only the transport you pass and the server-level parameters.- The older
supports_credsspandsupports_kerberosparameters still work, but offer fewer options.
Limitations
- Plain Text WinRM transport does not work with Windows Active Directory domain credentials.
- CMP does not detect a cluster node added after the resource handler was created.
- Internal and Private network types are not cluster-aware.
- A network using a DHCP addressing scheme cannot be statically addressed by IPAM or a resource pool.
- Linux customization requires cloud-init in the source image.
- Generation 1 Linux images with several disks on IDE controllers cannot be customized.
- Fixed and differencing disk types, and multiple disk controllers, are not supported.
Related
- SCVMM: managing Hyper-V hosts and clusters through System Center Virtual Machine Manager instead of connecting to them directly.
- Windows Sysprep: how CMP uses answer files to customize Windows guests.
- Use password vaults: storing handler credentials in HashiCorp Vault, CyberArk, Keeper, AWS Secrets Manager, or Azure Key Vault.
- Resource handlers: the technologies CMP connects to, and how to add and delete a handler.