Terraform operations
9 minute read
A Terraform Operation is a blueprint build item that points to a Terraform source, such as a zip file, a git repository, or a URL. When the blueprint is ordered, Cloud Management Platform (CMP) runs that source, stores the resulting state, and creates a resource representing what Terraform built. Values pass from CMP into Terraform through variable maps.
Add a Terraform Operation to a blueprint
-
Open Catalog and select the blueprint.
-
Open the Build tab.
-
Select Terraform Operation.
-
Complete the dialog and save.
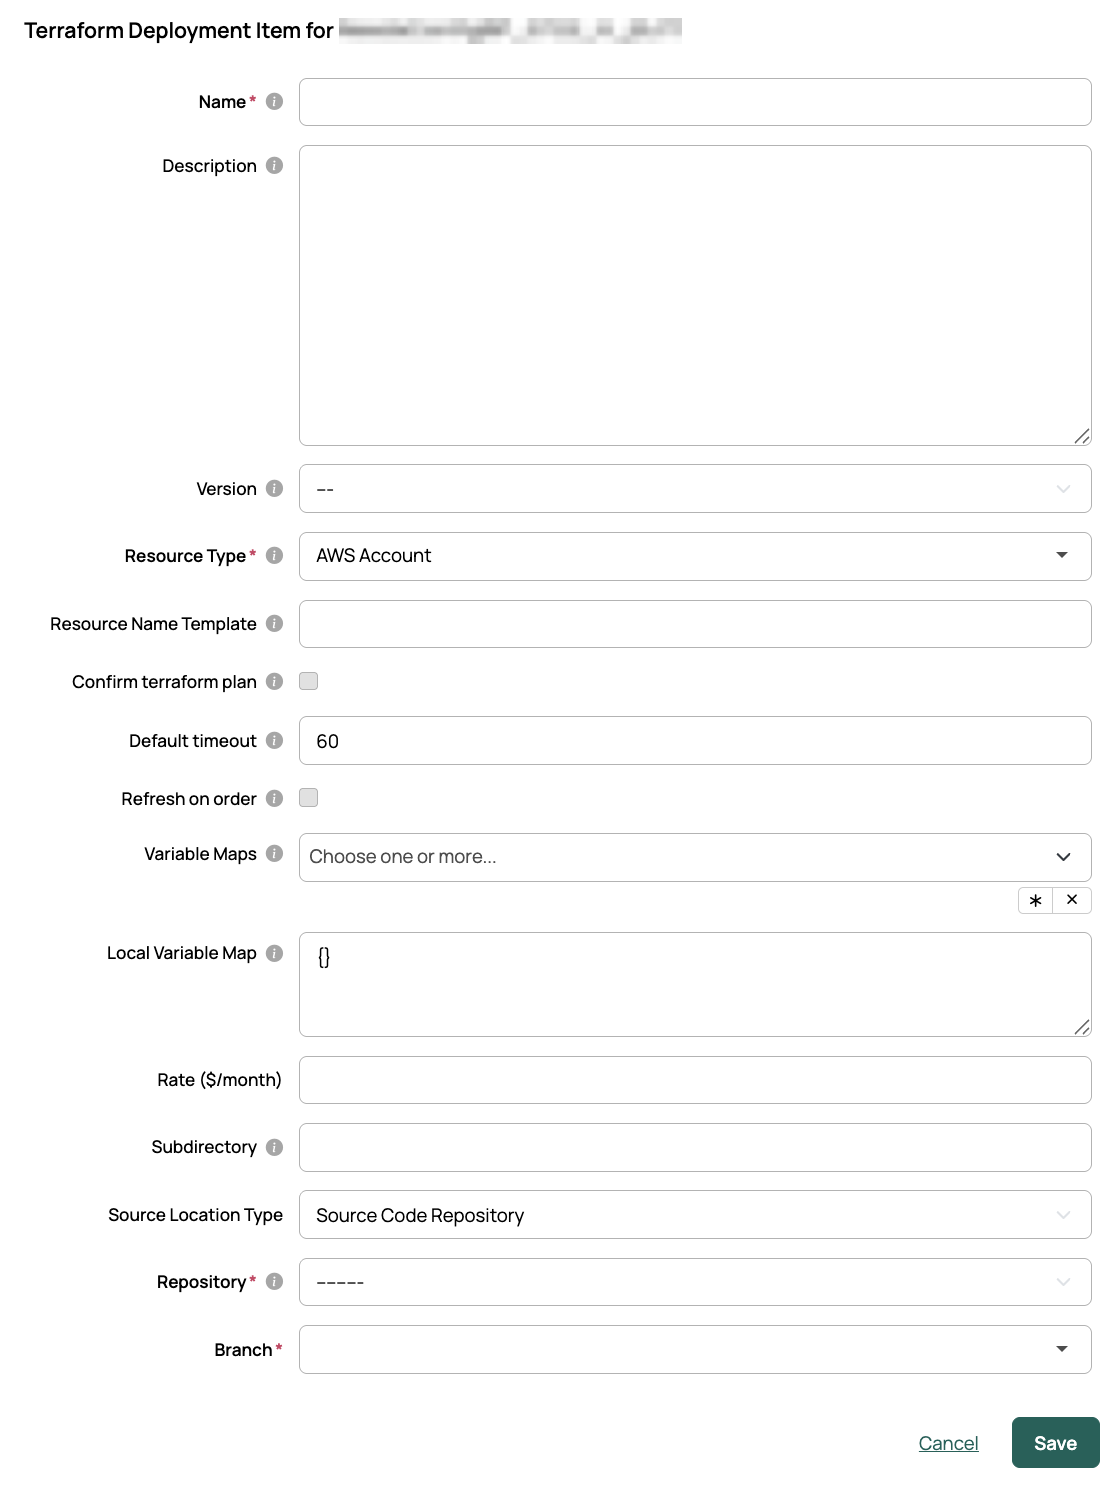
The Terraform Operation button appears only when that build item is enabled on your instance.
Choose where the source comes from
Source Location Type governs which location fields the dialog shows. Whichever you pick, the source must contain a .tf file defining what the build item does.
- Source Code Repository. Select a Repository and a Branch.
- Legacy Location Options. Set File location to upload a zip file, fetch a zip file from a URL, fetch a git repository from a URL, or point at a directory on the CMP server’s filesystem.
File location and Connection Info are hidden until Source Location Type is set to Legacy Location Options.
Additional fields
| Field | Description |
|---|---|
| Subdirectory | Use a specific subdirectory when the source contains several folders. |
| Connection Info | Authentication for a zip file or git repository fetched from a URL. Required for a private git repository. Appears under Legacy Location Options only. |
| Resource Type | The kind of object created to represent this build item once ordered. Defaults to Service. |
| Resource Name Template | A template for generating the name of the resource this build item deploys. |
| Version | Which Terraform binary runs the source. Left empty, it uses the global version in Miscellaneous Settings. The list offers the versions installed on the appliance, as described under Install another Terraform version. |
| Confirm terraform plan | Pauses the job after terraform plan and before terraform apply, so you can check what Terraform intends to do. |
| Default timeout | How long a paused job waits for that confirmation before resuming on its own. Defaults to 60. |
| Refresh on order | Pulls the latest code from the source before each run. |
| Variable Maps | One or more reusable maps passing values from CMP into Terraform. |
| Local Variable Map | A JSON map defined on this build item alone. |
| Rate | An optional cost rate for this build item. |
After creating the build item
A Terraform Operation blueprint must have at least one environment enabled. Expand the panel on the Build tab and select Attach an environment.
Enable as many environments as you like; the user picks one at order time. This becomes relevant when a variable map references environment attributes, because the map can read the environment from the order context.
You can also predefine parameters for an environment. Any predefined parameter used in a variable map passes its value straight to Terraform.
Private Git connection info
A source can be an HTTP or HTTPS URL for a git clone, with an optional subdirectory. CMP clones the repository onto the host when the Terraform Operation is created.
For a private repository, create a Connection Info for the host using the Git Connection Info form, with these fields:
| Field | Description |
|---|---|
| Name | A name you’ll recognize when you select it on a Terraform Operation. |
| Host | For example, github.com. It must match the start of the URL. |
| Protocol | For example, https. |
| Username | Your username on that host. |
| Auth Token | For example, a GitHub personal access token. Once saved, this shows as the Password field. |
Only HTTP and HTTPS are supported for repositories needing authentication, such as https://github.com/myco/my-terraform.git. SSH sources such as git@github.com:myco/terraform.git are not supported.
Install another Terraform version
CMP runs Terraform from a binary in /var/opt/cloudbolt/terraform/bin/. Each Linux binary it finds there is offered, by filename, in the Version list on a Terraform Operation and in Terraform Version under Admin > Miscellaneous Settings.
-
Download the Linux AMD64 build you want from HashiCorp’s Terraform releases.
-
On the appliance, extract it outside the binary directory, then move and rename it to
terraform_<version>:sudo su - cd /tmp unzip terraform_1.9.5_linux_amd64.zip mv terraform /var/opt/cloudbolt/terraform/bin/terraform_1.9.5 chown cloudbolt:cloudbolt /var/opt/cloudbolt/terraform/bin/terraform_1.9.5 chmod +x /var/opt/cloudbolt/terraform/bin/terraform_1.9.5
The new version appears in both lists straight away.
terraform in the binary directory is a symlink to the global default version. Extracting an archive there replaces the symlink with a plain file, and Miscellaneous Settings then appears to save a new global version without changing anything. To recover, delete the file and set the global version again.
Variable maps
A variable map passes values from CMP into Terraform. With the feature enabled, Variable Maps appears in the CloudBolt Objects section of the admin page.
Every instance ships with two maps configured for Terraform’s AWS and Azure providers, including the ability to pull credentials from a resource handler in the context. To use them, add one to your Terraform Operation, enable the matching AWS or Azure environments, and select one on the order form.
Maps are composable: adding several to one Terraform Operation merges them into a single dictionary, much like updating one Python dictionary with another.
Create a map
Go to Admin > Variable Maps, select New Variable Map, and give it a recognizable name.
The map itself is a JSON dictionary of keys to values. Keys must match the variable names Terraform expects: real Terraform variables conventionally start with TF_VAR_. The values are handed to the Terraform binary.
Maps can be templated in the same Django style used elsewhere in CMP, letting you reference objects in the order-time context. Most things use dot notation, such as {{ environment.name }}, but parameters are referenced by name, so {{ param_name }} renders the value of the parameter called param_name.
This example defines two Terraform variables: start_message, referencing six parameters, and sleep_seconds, reaching the resource handler ID through the environment.
{

  "TF_VAR_start_message": "Starting with {{ vmware_cluster }}, {{ created_by_terraform }}, and {{ cpu_cnt }}. Plus {{ provided_pc }}, {{ predefined_pc }}, and {{ test }}",

  "TF_VAR_sleep_seconds": "{{environment.resource_handler.id }}"

}
If the Terraform source defines a default for a variable and no map supplies a value, Terraform uses its default.
To point an existing Terraform Operation at a new map, return to the blueprint’s Build tab and select the pencil icon to edit the build item.
Single-option blueprint parameters resolve to nothing. When a blueprint-level parameter has only one valid option, CMP hides it from the order form, and hidden parameters are not in the order-time context, so {{ param_name }} renders empty. This matches CMP’s parameter options behavior. Supply the value at order time, hard-code it in the map, or give the Terraform configuration a default instead.
{

  "TF_VAR_instance_type": "t2.nano"
}
Order a Terraform operation
- On the blueprint’s Overview tab, select Order.
- Choose a group if prompted, then select an environment. If only one is available, it is selected for you. The form then fills in from the variable maps on the build item.
- Complete any remaining parameter fields and submit the order.
- Watch the resulting Terraform job to follow the Terraform commands and confirm the plan if the build item uses Confirm terraform plan.
You are prompted only for parameters that a variable map references and that are not already accounted for: blueprint-level parameters, parameters provided with a single option, and parameters predefined when the environment was enabled all get their values behind the scenes without appearing on the form.
What the order creates
The Terraform job spawns a Parse Terraform State sub-job, which uses the built-in action of that name to read Terraform’s output. If the source created servers, currently AWS or Azure only, CMP creates placeholder records for them, marked with the Created by Terraform parameter. They are filled out fully the next time Sync VMs runs on that resource handler.
Every Terraform job also creates a resource of the build item’s resource type, as a sub-resource of the blueprint’s own resource. So the parent might be a Service, with a sub-resource of a type you defined called Terraform. The sub-resource contains an Output object with the run results, including the state file, which is shown on its Output tab. It is automatically named “State for My Build Item from My Blueprint” after the Terraform Operation and its blueprint. Any servers created are grouped under it.
Day-2 operations
CMP has no dedicated day-2 mechanism for Terraform, but most server-level operations work through the normal CMP controls. To power a server off, for example, use Power Off on its details page. Deletion is the exception.
Delete Terraform resources
Delete the resource through CMP, which runs Terraform’s destroy command. Deleting servers created by a Terraform Operation directly can leave cleanup incomplete or cause steps to run out of order.
Onboard existing resources (brownfield)
To onboard resources created outside CMP for a blueprint containing Terraform Operation service items, create the top-level resource and then a sub-resource for each Terraform Operation service item on the blueprint. The sub-resource holds that item’s Terraform state file.
The discovery_create_tfstate_sub_resource method on the TerraformOperationBlueprintItem model does this:
| Parameter | Type | Required | Description |
|---|---|---|---|
group |
Group | Yes | The group assigned to the resource. Must match the top-level parent resource. |
owner |
UserProfile | Yes | The resource owner. Must match the top-level parent resource. |
environment |
Environment | Yes | The environment mapping to the cloud provider where Terraform created the resource. |
resource |
Resource | Yes | The top-level resource created during discovery. |
state_file_dict |
dict | Yes | The Terraform state file created when the resource was built. |
parameters |
dict | No | Name-value pairs for Terraform variable mappings. May consist of: - Blueprint parameters - Group parameters - Environment parameters |
Onboarding sample
This script creates a CMP resource for infrastructure provisioned outside CMP and links it to a blueprint whose single Terraform Operation service item builds an EC2 instance.
#!/usr/bin/env python
import json
import os
import sys

sys.path.insert(0, "/opt/cloudbolt")
os.environ.setdefault("DJANGO_SETTINGS_MODULE", "settings")

if __name__ == '__main__':
    import django
    django.setup()

from accounts.models import Group, UserProfile
from common.methods import generate_unique_name
from servicecatalog.models import ServiceBlueprint
from resources.models import Resource

# Lookup IDs
blueprint_gid = "BP-bbhacwtf" # Change this to your blueprint global id
group_name = "Enter Group Name"
username = "Enter Resource Owner username"

# Get the Blueprint
blueprint = ServiceBlueprint.objects.get(global_id=blueprint_gid)

# Create Type level Resource
resource_name = generate_unique_name(
    blueprint.name,
    Resource,
    excludes={"lifecycle": "HISTORICAL"},
    filter_by={"resource_type_id": blueprint.resource_type.id},
)

group = Group.objects.get(name=group_name)
owner = UserProfile.objects.get(user__username=username)
resource = Resource.objects.create(
        name=resource_name,
        group=group,
        owner=owner,
        blueprint=blueprint,
        lifecycle="PROV",
        resource_type=blueprint.resource_type,
)

# Create Sub Resource for Terraform State
service_item = blueprint.serviceitem_set.filter(genericjobserviceitem__terraformoperationblueprintitem__isnull=False).first()
tf_service_item = service_item.cast()

# Load the state file into a dictonary object
with open("/tmp/terraform_sample/terraform.tfstate", "r") as state_file:
    state_file_dict = json.loads(state_file.read())

# Parse attributtes from the state file, assign
# CloudBolt resource attributes and parameters.
resources  = state_file_dict.get("resources", [])
instance = resources[0].get("instances", [])[0]
attributes = instance.get("attributes")

resource.myorg_aws_ami = attributes.get("ami")
resource.myorg_aws_instance_name =  attributes.get("tags", {}).get("Name")
resource.myorg_aws_subnet = attributes.get("subnet_id")

# Get the environment associated with the Terraform Operation.
# We only have one in this sample, so using the first.
environment = tf_service_item.enabled_environments.first()

# Add blueprint and environment inputs added to the resource
# during provisioning; required when deleting the resource
parameters = {
    "aws_region": environment.aws_region,
    "instance_type": attributes.get("instance_type"),
    "key_name": attributes.get("key_name"),
}

tfstate_resource = tf_service_item.discovery_create_tfstate_sub_resource(
    group,
    owner,
    environment,
    resource,
    state_file_dict,
    parameters=parameters,
)

resource.lifecycle="ACTIVE"
resource.save()