Use Windows Sysprep with resource handlers
4 minute read
Microsoft Windows System Preparation (Sysprep) prepares a Windows installation for imaging by removing system-specific data, allowing it to be deployed on other machines.
Sysprep can be used independently or with an Answer file (also known as an unattend file or unattend.xml). The Answer file instructs Sysprep how to configure the operating system during the next boot.
When using Sysprep with an Answer file that includes CMP resource handlers, note that the XML Answer file adheres to a strict schema. Sysprep fails if the Answer file contains malformed XML, misplaced values, or incorrectly structured elements.
Resource handler Sysprep support
The following resource handlers natively support VM customization with Sysprep:
| Resource handler | Parameter name |
|---|---|
| Hyper-V | hyperv_sysprep_file |
| Nutanix Acropolis | acropolis_sysprep_file |
| Oracle Linux Virtualization Manager | olvm_sysprep_file |
| VMware | vmware_sysprep_file |
Other resource handlers can use Sysprep through remote scripts or CMP plugins executed during post-provision orchestration, but they do not provide native Sysprep integration.
Preparing a Sysprep Answer file
To prepare an Answer file for a Windows image:
-
Install the Windows Assessment and Deployment Kit (Windows ADK).
This installs Windows System Image Manager (Windows SIM), a tool for importing Windows images and creating Answer files.
-
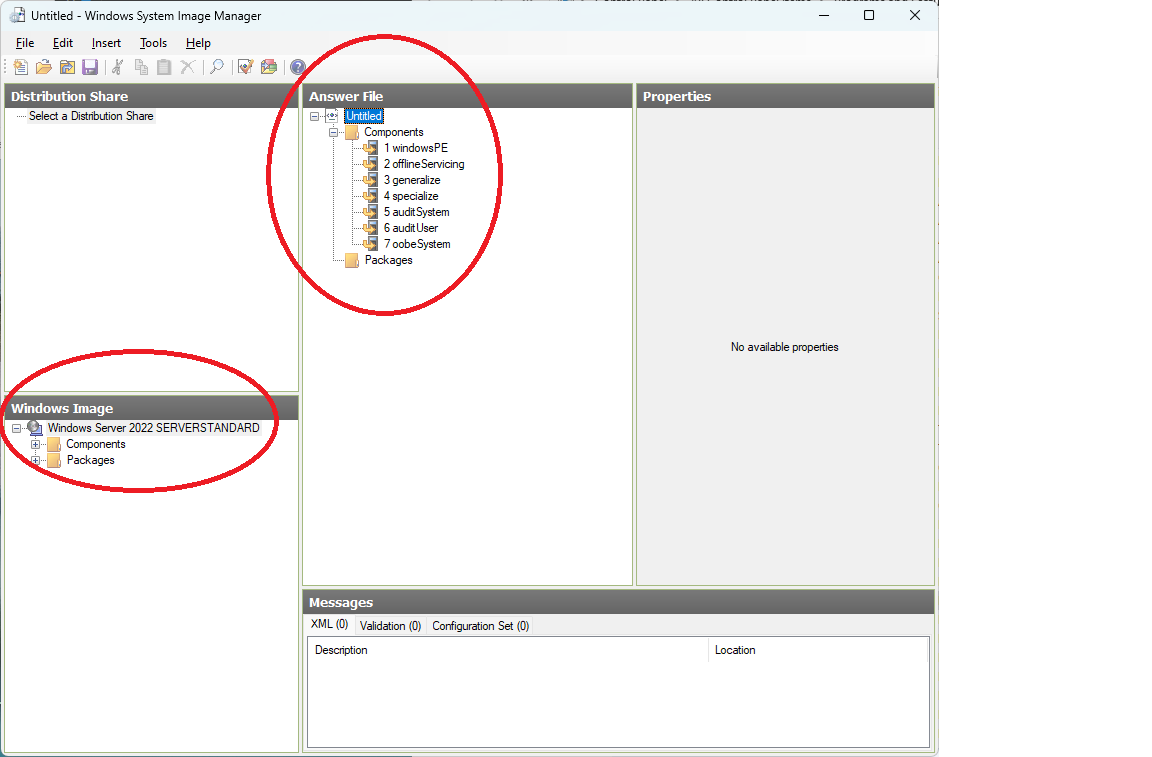
Import the Windows image into Windows SIM.
 (opens full-size image in a new tab)
Windows SIM with the Answer file and Windows Image panes highlighted.
-
Add configuration components.
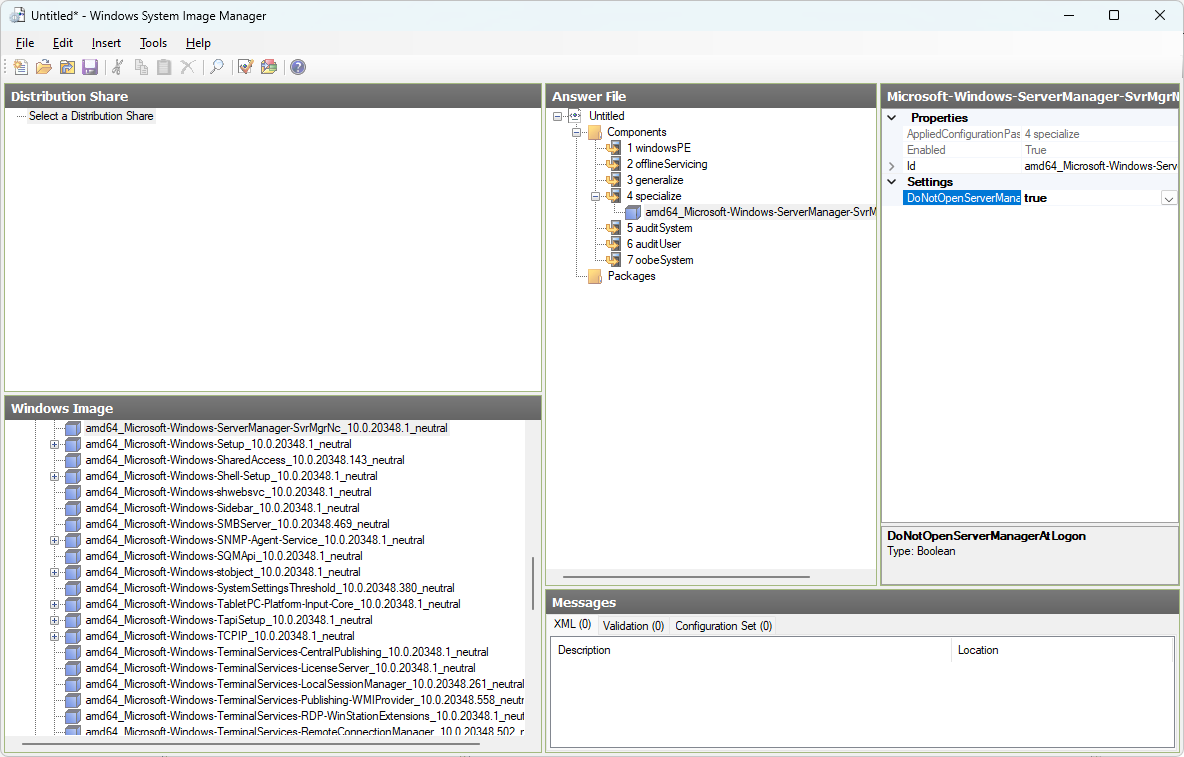
Expand the image’s components or packages, then drag items into the appropriate configuration pass (for example, specialize). Windows SIM prevents components from being dropped into the wrong pass.
 (opens full-size image in a new tab)
Components tree expanded, Edit > Find used to locate ServerManager, and the amd64 component dragged to the specialize pass and configured with
DoNotOpenServerManagerAtLogon = true. -
Save the Answer file.
Go to File > Save Answer File to generate the XML file.
<?xml version="1.0" encoding="utf-8"?>
<unattend xmlns="urn:schemas-microsoft-com:unattend">
  <settings pass="specialize">
    <component name="Microsoft-Windows-ServerManager-SvrMgrNc" processorArchitecture="amd64" publicKeyToken="31bf3856ad364e35" language="neutral" versionScope="nonSxS" xmlns:wcm="http://schemas.microsoft.com/WMIConfig/2002/State" xmlns:xsi="http://www.w3.org/2001/XMLSchema-instance">
      <DoNotOpenServerManagerAtLogon>true</DoNotOpenServerManagerAtLogon>
    </component>
    <component name="Microsoft-Windows-Shell-Setup" processorArchitecture="amd64" publicKeyToken="31bf3856ad364e35" language="neutral" versionScope="nonSxS" xmlns:wcm="http://schemas.microsoft.com/WMIConfig/2002/State" xmlns:xsi="http://www.w3.org/2001/XMLSchema-instance">
      <ComputerName>SOMESERVER</ComputerName>
    </component>
  </settings>
  <settings pass="oobeSystem">
    <component name="Microsoft-Windows-Shell-Setup" processorArchitecture="amd64" publicKeyToken="31bf3856ad364e35" language="neutral" versionScope="nonSxS" xmlns:wcm="http://schemas.microsoft.com/WMIConfig/2002/State" xmlns:xsi="http://www.w3.org/2001/XMLSchema-instance">
      <OOBE>
        <HideEULAPage>true</HideEULAPage>
        <HideLocalAccountScreen>true</HideLocalAccountScreen>
        <HideOEMRegistrationScreen>true</HideOEMRegistrationScreen>
        <HideOnlineAccountScreens>true</HideOnlineAccountScreens>
        <HideWirelessSetupInOOBE>true</HideWirelessSetupInOOBE>
        <ProtectYourPC>3</ProtectYourPC>
        <SkipMachineOOBE>true</SkipMachineOOBE>
        <SkipUserOOBE>true</SkipUserOOBE>
        <UnattendEnableRetailDemo>false</UnattendEnableRetailDemo>
      </OOBE>
      <UserAccounts>
        <AdministratorPassword>
          <Value>UwBvAG0AZQBQAGEAcwBzAHcAbwByAGQAMQAyADMAQQBkAG0AaQBuAGkAcwB0AHIAYQB0AG8AcgBQAGEAcwBzAHcAbwByAGQA</Value>
          <PlainText>false</PlainText>
        </AdministratorPassword>
        <LocalAccounts>
          <LocalAccount wcm:action="add">
            <Password>
              <Value>UwBvAG0AZQBQAGEAcwBzAHcAbwByAGQAMQAyADMAUABhAHMAcwB3AG8AcgBkAA==</Value>
              <PlainText>false</PlainText>
            </Password>
            <Name>cbadmin</Name>
            <Group>Administrators</Group>
            <DisplayName>CloudBolt Admin</DisplayName>
            <Description>another administrator</Description>
          </LocalAccount>
        </LocalAccounts>
      </UserAccounts>
    </component>
  </settings>
</unattend>
Example Answer file.
Templatizing an Answer file
To use an Answer file with resource handlers, you can convert static XML values into dynamic template variables. CMP substitutes values based on the object.
Templatization replaces XML values with variables using CMP’s template syntax.
Example: Templatizing the computer name
Before:
<component name="Microsoft-Windows-Shell-Setup" processorArchitecture="amd64" publicKeyToken="31bf3856ad364e35" language="neutral" versionScope="nonSxS" xmlns:wcm="http://schemas.microsoft.com/WMIConfig/2002/State" xmlns:xsi="http://www.w3.org/2001/XMLSchema-instance">
  <ComputerName>SOMESERVER</ComputerName>
</component>
After:
<component name="Microsoft-Windows-Shell-Setup" processorArchitecture="amd64" publicKeyToken="31bf3856ad364e35" language="neutral" versionScope="nonSxS" xmlns:wcm="http://schemas.microsoft.com/WMIConfig/2002/State" xmlns:xsi="http://www.w3.org/2001/XMLSchema-instance">
  <ComputerName>{{ server.hostname }}</ComputerName>
</component>
Example: Templatizing the administrator password
Answer files expect administrator passwords to be encoded when the PlainText value is False. CMP provides the Django filter salt_and_encode_windows_password to produce an encoded password for Sysprep.
Before:
<AdministratorPassword>
  <Value>UwBvAG0AZQBQAGEAcwBzAHcAbwByAGQAMQAyADMAQQBkAG0AaQBuAGkAcwB0AHIAYQB0AG8AcgBQAGEAcwBzAHcAbwByAGQA</Value>
  <PlainText>false</PlainText>
</AdministratorPassword>
After:
<AdministratorPassword>
  <Value>{{ server.password|salt_and_encode_windows_password }}</Value>
  <PlainText>false</PlainText>
</AdministratorPassword>
Example: Templatizing local accounts
Some Answer file sections, such as LocalAccounts, require different salting rules.
Provide the required salt type as an argument to the filter:
<Value>{{ server.password|salt_and_encode_windows_password:"Password" }}</Value>
You may also templatize account or display names:
<Name>{{ server.owner.username }}</Name>
<DisplayName>{{ server.owner.first_name}} {{server.owner.last_name }}</DisplayName>
Common Answer file issues
Unintended spaces in templated values
Spaces inside <value> tags are interpreted literally, altering the encoded value and preventing Sysprep from decoding it.
Invalid:
<Value> {{ server.password|salt_and_encode_windows_password:"Password" }} </Value>
Both leading and trailing spaces produce an incorrect password value.
Spaces inside the template braces are allowed ({{ variable }}): CMP renders Answer files with Django’s template language, which ignores whitespace inside variable tags, so it does not affect the final value.
Passwords failing complexity requirements
If a generated password does not meet Windows password complexity requirements, Sysprep exits with an error. CMP does not validate password complexity for Answer files—this is the administrator’s responsibility.
Troubleshooting Answer files using Shell Plus
CMP’s Shell Plus tool helps validate templated Answer files by rendering them with server object values.
Shell Plus requires root privileges.
-
Start Shell Plus on the CMP appliance.
/opt/cloudbolt/manage.py shell_plus -
Define your Answer file template.
sysprep_template = """ <?xml version="1.0" encoding="utf-8"?> <unattend xmlns="urn:schemas-microsoft-com:unattend"> <settings pass="specialize"> <component name="Microsoft-Windows-ServerManager-SvrMgrNc" processorArchitecture="{{ sysprep_processor_architecture }}" publicKeyToken="31bf3856ad364e35" language="neutral" versionScope="nonSxS" xmlns:wcm="http://schemas.microsoft.com/WMIConfig/2002/State" xmlns:xsi="http://www.w3.org/2001/XMLSchema-instance"> <DoNotOpenServerManagerAtLogon>true</DoNotOpenServerManagerAtLogon> </component> <component name="Microsoft-Windows-Shell-Setup" processorArchitecture="{{ sysprep_processor_architecture }}" publicKeyToken="31bf3856ad364e35" language="neutral" versionScope="nonSxS" xmlns:wcm="http://schemas.microsoft.com/WMIConfig/2002/State" xmlns:xsi="http://www.w3.org/2001/XMLSchema-instance"> <ComputerName>{{ server.hostname }}</ComputerName> </component> </settings> <settings pass="oobeSystem"> <component name="Microsoft-Windows-Shell-Setup" processorArchitecture="{{ sysprep_processor_architecture }}" publicKeyToken="31bf3856ad364e35" language="neutral" versionScope="nonSxS" xmlns:wcm="http://schemas.microsoft.com/WMIConfig/2002/State" xmlns:xsi="http://www.w3.org/2001/XMLSchema-instance"> <OOBE> <HideEULAPage>true</HideEULAPage> <HideLocalAccountScreen>true</HideLocalAccountScreen> <HideOEMRegistrationScreen>true</HideOEMRegistrationScreen> <HideOnlineAccountScreens>true</HideOnlineAccountScreens> <HideWirelessSetupInOOBE>true</HideWirelessSetupInOOBE> <ProtectYourPC>3</ProtectYourPC> <SkipMachineOOBE>true</SkipMachineOOBE> <SkipUserOOBE>true</SkipUserOOBE> <UnattendEnableRetailDemo>false</UnattendEnableRetailDemo> </OOBE> <UserAccounts> <AdministratorPassword> <Value>{{ server.password|salt_and_encode_windows_password }}</Value> <PlainText>false</PlainText> </AdministratorPassword> </UserAccounts> </component> </settings> </unattend> """ -
Define the server object.
server = Server.objects.get(id=1234)Note: Update the ID for the target server.
-
Generate the Answer file.
from common.methods import generate_string_from_template_for_server

answer_file = generate_string_from_template_for_server(
    sysprep_template, server
)
print(answer_file)
If the output is blank, malformed, or missing values, check for:
- Invalid XML syntax
- Typographical errors in variable names
- Template variables that do not exist in the server object
Next steps
With a Sysprep Answer file generated, you can use it with a Hyper-V, Nutanix Acropolis, Oracle Linux Virtualization Manager, or VMware resource handler.