# Office 365 identity provider
> Set up single sign-on (SSO) for Cloud Management Platform (CMP) using Office 365
---
Site [llms.txt](/llms.txt)
---
Office 365 uses the same setup as Microsoft Entra (formerly Azure AD). The screenshots here are from the Microsoft Entra SSO interface.
## Before you begin
- Complete [Set up SSO and SAML](/docs/cmp/configure/access-and-security/users/sso-saml/set-up/) and [Configure the identity provider](/docs/cmp/configure/access-and-security/users/sso-saml/configure-identity-provider/).
- Capture the [IdP XML metadata](/docs/cmp/configure/access-and-security/users/sso-saml/configure-identity-provider/#upload-and-download-metadata).
- Create at least one [branded portal](/docs/cmp/configure/administration/system/branded-portals/) for this SSO provider.
## Configure Office 365
In Office 365, configure an enterprise application linked to SSO for CMP.
1. In Office 365, manage the enterprise application.
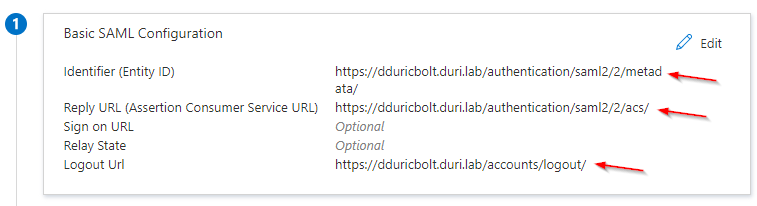
1. In the **Manage** menu, select **Single sign-on**. Set **Identifier (Entity ID)**, **Reply URL (Assertion Consumer Service URL)**, and **Logout URL** to point to your CMP instance.
### Copy the claim names
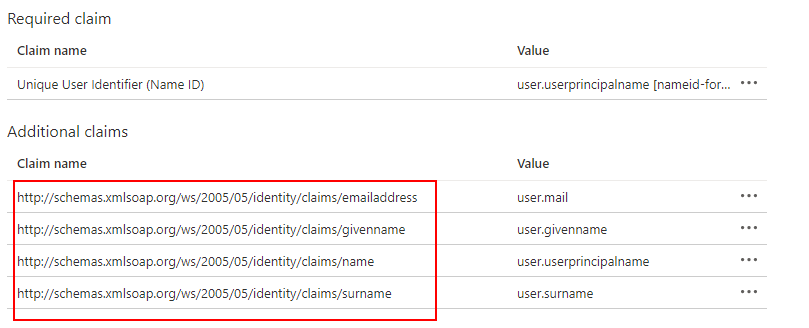
User attributes and claims are standard in Office 365. You can change the defaults or add more if required.
1. In **User Attributes & Claims**, select **Edit**.
1. In the **Additional claims** > **Claim name** column, copy the claim names. You will use them during CMP configuration.
### Set up signing and notifications
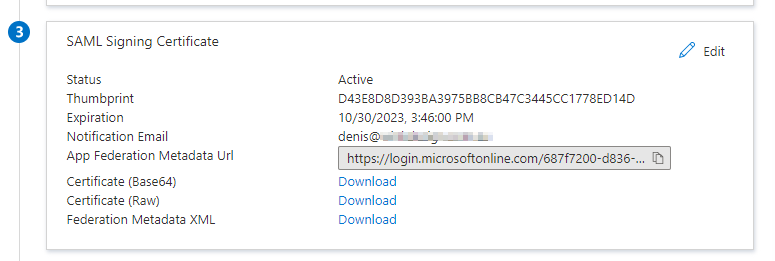
1. In this example, **Sign SAML Assertion** and **SHA-256** are set, along with an email address for notifications.
1. Gather the federation metadata for CMP configuration: either copy the **App Federation Metadata URL** or download the **Federation Metadata XML** file.
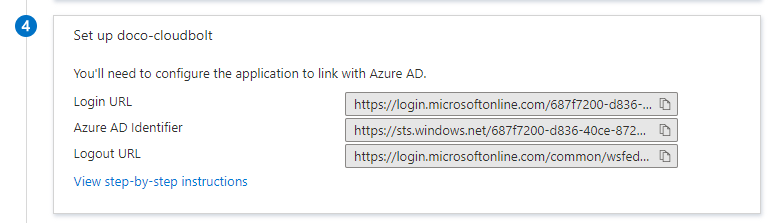
1. In Office 365, configure Step 4 as shown.
Step 5 in Office 365 (Test single sign-on) does not work until SSO is configured in CMP.
Make sure you have added the users and groups that need access to this enterprise application.
## Set up Office 365 SSO in CMP
1. Follow the steps in [Set up SSO and SAML](/docs/cmp/configure/access-and-security/users/sso-saml/set-up/).
1. On the SSO provider's [SAML settings](/docs/cmp/configure/access-and-security/users/sso-saml/set-up/#saml-settings), complete the fields with information from your Office 365 tenant. Set **Name ID Format** to **Email Address** and clear **Response Signed**.
1. In the **Attribute Name** fields, paste the claim names from [Copy the claim names](#copy-the-claim-names), step 2.
1. Select **Create**.
### Upload the Office 365 metadata
1. On the **Overview** tab, select **Upload IdP XML**.
1. Choose a source for the metadata. In this example, **Metadata URL** is used.
1. Paste the App Federation Metadata URL you copied in [Set up signing and notifications](#set-up-signing-and-notifications), step 2.
1. Select **Save**.
### Log in with SSO
Log out of CMP and log back in. You should see a **Log In with *\*** button.
- If you are logged in with a valid user, you are automatically redirected and logged in.
- If you are logged out of Office 365, it sends a two-factor authentication request if two-factor authentication is configured.